In Dostana John use a condom to fuck Priyanka Chopra.
And Bachan seeing her ash.
Let's Enjoy It is a2z-films exclusive.
And Bachan seeing her ash.
Let's Enjoy It is a2z-films exclusive.
![]()
![]()
We all know that getting a new IP address from ISP allows us to download the next file from RapidShare. I bet many of us know this concept long ago but there wasn’t any program that can do this. Now, here is a program called Cryptload that is able to download the first file automatically without you entering the CAPTCHA code, and when it finished downloading, it will try to download the second file. Once it detects “You have reached the download-limit for free-users” message from RapidShare, it’ll disconnect and reconnect your Internet to get a new IP address. Then it’ll continue downloading the second file. All this is done automatically and you only need to add the RapidShare links to Cryptload. How easy is that?
But before you get to automate RapidShare downloading, I’ll show you what you need to do because I was stuck for a few days on Cryptload with some problems.  Most important setting that you must get it right is the Router section. Other than that, there is nothing else you need to configure in Cryptload. You can access Cryptload options by clicking the top right button that looks like this. Click on the Router button to configure your router settings. If you are using a modem to connect to the internet, select the Modem button. How do you know if you’re using a modem or router? If you need to dial up to the Internet like the below image, then you’re using a modem.
If your internet automatically when you turn on the power for the small box, then it’s a router. So if you are using a router, click on the dropbox and search for your router model in the list.
Here are the settings you must configure correctly.
IP Address: The IP Address of your router. To know your router’s IP address, run command prompt, type ipconfig and the Default Gateway is your router’s IP address.
Username and Password: The username and password used to login to your router. Please check your router’s manual if you don’t know the default login data.
Waittime after reconnect in sec: This is the time that it’ll wait to download the next RapidShare file after Cryptload tries to reconnect to the Internet. It depends on your ISP. Some might take longer to reconnect. Try 15 seconds first and if your Internet doesn’t gets connected before 15 seconds, increase it to 30 seconds and so on…
Now you can use Cryptload to automate RapidShare downloading. Here is how I do it.
1. Collect all RapidShare links that I want to download and paste them into a text file.
2. Run Cryptload
3. On the text file, press CTRL+A to select all, and then press CTRL+C. Link collector will appear and it will automatically decrypt the links.
4. Press Add button and press OK at Package settings. You can change the downloaded files location if you want.
What if your router’s model is not in the list?
Not to worry at all because the people who created Cryptload are very nice people and they are very willing to help you to create CLR file to support your router. Here’s what you need to do.
1. Install Live HTTP Headers extension for your Firefox browser.
2. Run Firefox, go to Tools -> Live HTTP Headers. Make sure capture checkbox is checked.
3. Go to Firefox window, login to your router, manually disconnect and then reconnect to the internet.
4. Go back to the Live HTTP headers, click Save all button and save it as router.txt
5. Click close to close Live HTTP headers.
6. Go to www.nopaste.com, enter your name in Nick, Description as your router brand with model and firmware version if possible. Make sure Plain is selected for language. Click on the Browse button and look for the router.txt file. Finally click Paste.
7. Wait for a few seconds, and you’ll be forwarded to a new page with the URL something like http://nopaste.com/p/xXXxxXxxX.
8. Go to www.cryptload.info website, at Live-Support, enter your username (your name), E-mail and click Los button. If cryptload staff is available, you can give them the nopaste URL to create your router’s CLR file. If not, you can fill up the form to send an email to them. I am sure they’ll get back to you with your CLR file.
Another way is to join Cryptload IRC channel and try getting help there. The person that patiently helped me from the beginning till the end was Apokalypser.
IRC Server: irc.german-elite.net
Channel: #cryptload
Once you got the CLR file from Cryptload staff, copy it to Cryptload’s router folder and it’ll be included in the router list when you run Cryptload the next time. Cryptload is a perfect way to unlimited rapidshare downloading. Well, only perfect for those with dynamic IP address. It is developed by shira, bocka and apokalypser. For those with static IP adress Rapid GraB may be the best way for you. NOTE: Cryptload requires at least Microsoft .NET Framework v2.0 and above. [ Download Cryptload | Cryptload Website ]
![]()
A lot of you people must use orkut and must be wondering how to change the default boring orkut theme. Well, your search is over. I have personally made 20 brand new orkut themes that you wont find anywhere else on the net. Everything from NBA to Cricket to Firefox to Katrina Kaif! ![]()
I would like to point out though, that these orkut themes will only be shown to yourself when YOU are browsing orkut. So lets get started. First I will list the requirements that you need to fulfill in order to install these orkut themes.
Installation Procedure for these Orkut Themes
Once you have installed mozilla firefox and the greasemonkey addon then all you need to do is install any one of the following orkut themes. Below every theme image is a link to the script for that specific orkut theme. Just click on any one and you will be prompted to install it. Click install and it will be installed in a jiffy! You can then go to browse orkut with your new theme. If you want to change a theme then you will first install the new theme from this page. Then you have to right-click on the little “monkey” face in the status bar below. From there, you will see a list of your installed scripts which will have the different orkut themes. Just uncheck any theme you do not want to use and check any orkut theme that you do want to use. Its just that simple!
Uninstall Procedure for these Orkut Themes
If you want to completely remove any of these orkut themes then right-click the monkey face and click Manage User Scripts. You will see a list of your installed scripts. Just select any script that you want to remove and click the Uninstall button at the bottom. Its just that simple!
Note: Click image to see a higher resolution image of that orkut theme

To download this orkut theme, click here.

To download this orkut theme, click here.

To download this orkut theme, click here.

To download this orkut theme, click here.

To download this orkut theme, click here.

To download this orkut theme, click here.

To download this orkut theme, click here.

To download this orkut theme, click here.

To download this orkut theme, click here.

To download this orkut theme, click here.

To download this orkut theme, click here.

To download this orkut theme, click here.

To download this orkut theme, click here.

To download this orkut theme, click here.

To download this orkut theme, click here.

To download this orkut theme, click here.

To download this orkut theme, click here.

To download this orkut theme, click here.

To download this orkut theme, click here.

To download this orkut theme, click here.
Emma Watson Theme

Download this theme from here.
SRK Theme

Download this theme from here.
Daniel Radcliffe Theme

Download this theme from here.
Firefox Theme

Download this theme from here.
Skull Theme

Download this theme from here.
NBA Theme

Download this theme from here.
Puppy Theme

Download this theme from here.
City Life Theme

Download this theme from here.
Note: We have noticed that orkut recently happened to change some of their codes, so the themes are not loading for a few orkut profiles. We recommend you to try loading the themes and if it doesnt do anything even after waiting for a few minutes, we are sorry to say that your profile belongs to those few orkut profiles. Anyways, we are working 24/7 to get the themes to work for every orkut user.

|
Drona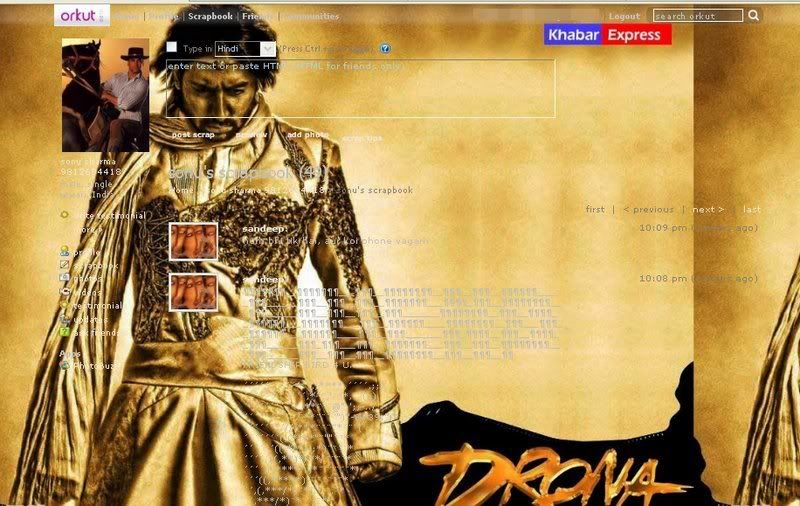 Copy the below code.
|
James Bond Copy the below code.
|
Bachna Ae Haseeno Copy the below code.
|
Batman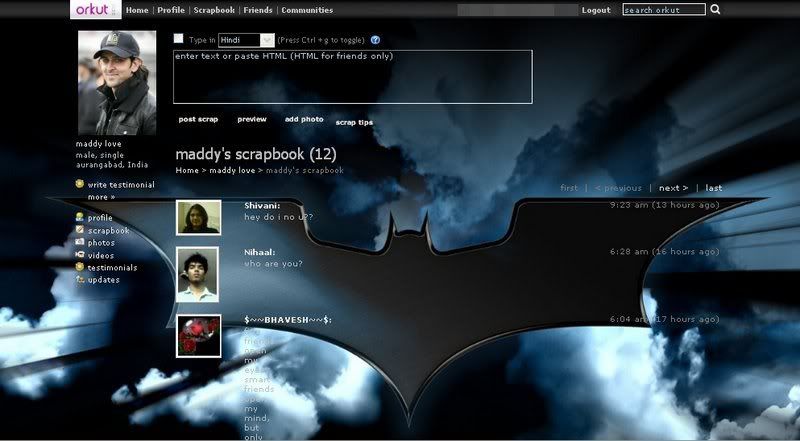 Copy the below code by selecting it and pressing Ctrl+C or right-click and select Copy.
|
Jaane Tu Ya Jaane Na Copy the below code by selecting it and pressing Ctrl+C or right-click and select Copy.
|
Batman - Dark Knight Copy the below code.
|
Singh is Kinng Copy the below code.
|
Phoonk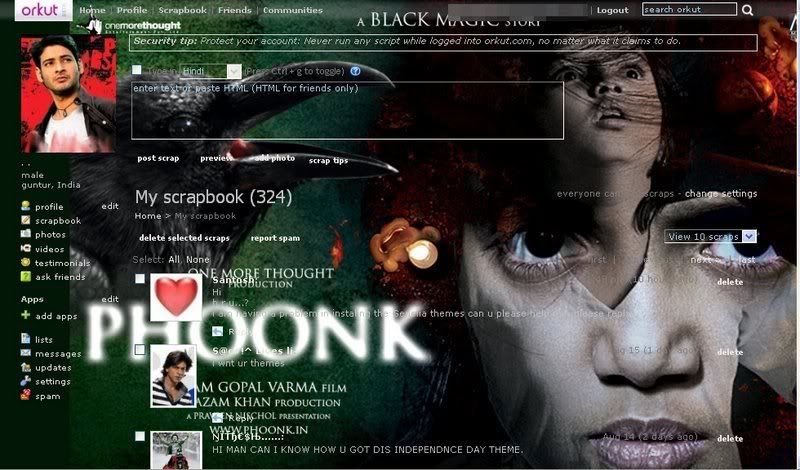 Copy the below code.
|
Pirate Skull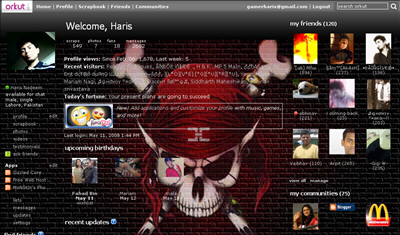 Copy the below code.
|
John Abraham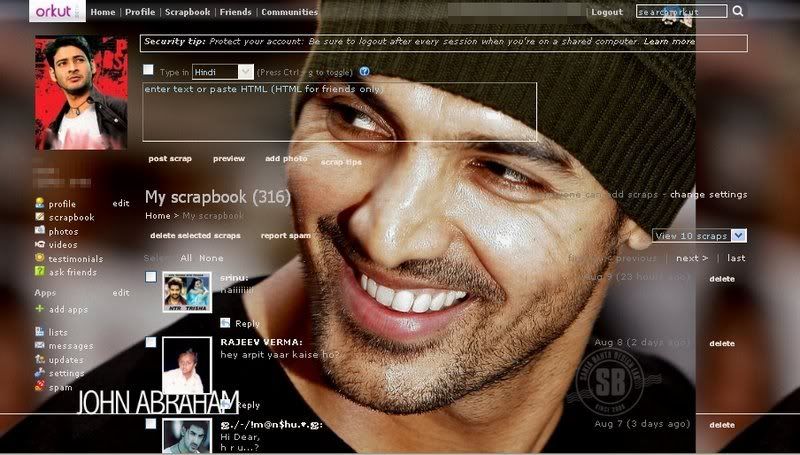 Copy the below code.
|
Triple H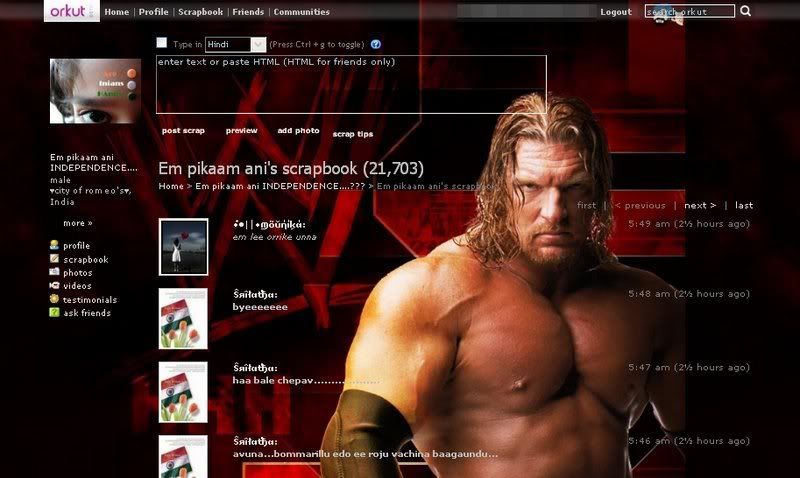 Copy the below code.
|
Cartoon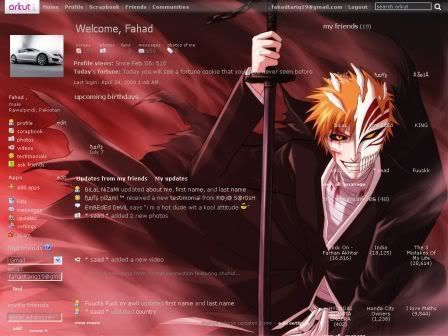 Copy the below code.
|
Naruto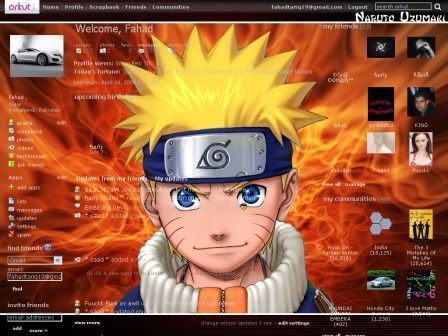 Copy the below code.
|
HellBoy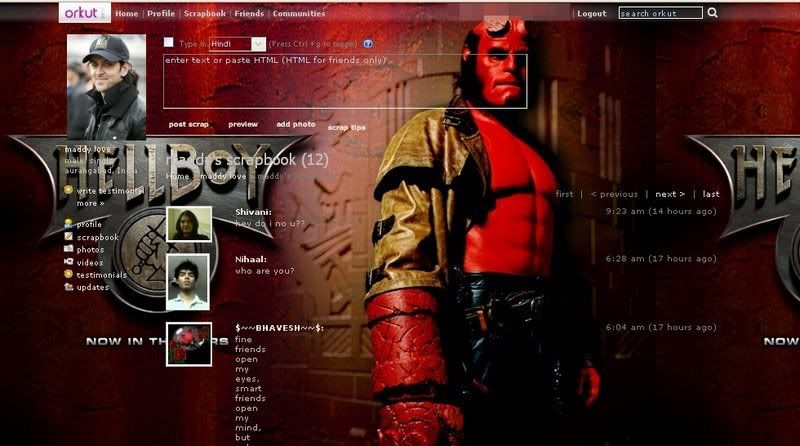 Copy the below code.
|
![]()
![]()
![]()
![]()
![]()
![]()
![]()
![]()
![]()
![]()
All latest Motherboards today, 486/ Pentium / Pentium Pro etc.,ensure that upgrades are easily obtained by incorporating the system BIOS in a FLASH Memory component. With FLASH BIOS, there is no need to replace an EPROM component. Once downloaded, the upgrade utility fits on a floppy disc allowing the user to save, verify and update the system BIOS. A hard drive or a network drive can also be used to run the newer upgrade utilities. However, memory managers can not be installed while upgrading.
Most pre-Pentium motherboards do not have a Flash BIOS. The following instructions therefore do not apply to these boards. If your motherboard does not have a Flash BIOS (EEPROM) you will need to use an EPROM programmer to re-program the BIOS chip. See your dealer for more information about this.
Please read the following instructions in full before starting a Flash BIOS upgrade:
A. Create a Bootable Floppy (in DOS)
•With a non-formatted disk, type the following:
format a:/s
•If using a formatted disk, type:
sys a:
This procedure will ensure a clean boot when you are flashing the new BIOS.
B. Download the BIOS file
•Download the correct BIOS file by clicking on the file name of the BIOS file you wish to download.
•Save the BIOS file and the Flash Utility file in the boot disk you have created. Unzip the BIOS file and the flash utility file. If you don’t have an “unzip” utility, download the WinZip for Windows 95 shareware/ evaluation copy for that one time use from _www.winzip.com or _www.pkware.com. Most CD ROMs found in computer magazines, have a shareware version of WinZip on them.
•You should have extracted two files:
Flash BIOS utility eg: flash7265.exe (for example)
BIOS eg: 6152J900.bin (example)
Use the latest flash utility available unless otherwise specified (either on the BIOS update page or in the archive file). This information is usually provided.
C. Upgrade the System BIOS
During boot up, write down the old BIOS version because you will need to use it for the BIOS backup file name.
Place the bootable floppy disk containing the BIOS file and the Flash Utility in drive a, and reboot the system in MS-DOS, preferably Version 6.22
•At the A:> prompt, type the corresponding Flash BIOS utility and the BIOS file with its extension.
For example:
flash625 615j900.bin
•From the Flash Memory Writer menu, select “Y” to “Do you want to save BIOS?” if you want to save (back up) your current BIOS (strongly recommended), then type the name of your current BIOS and its extension after FILE NAME TO SAVE: eg: a:\613J900.bin
Alternatively select “N” if you don’t want to save your current BIOS. Beware, though, that you won’t be able to recover from a possible failure.
•Select “Y” to “Are you sure to program?”
•Wait until it displays “Message: Power Off or Reset the system”
Once the BIOS has been successfully loaded, remove the floppy disk and reboot the system. If you write to BIOS but cannot complete the procedure, do not switch off, because the computer will not be able to boo, and you will not be given another chance to flash. In this case leave your system on until you resolve the problem (flashing BIOS with old file is a possible solution, provided you’ve made a backup before)
Make sure the new BIOS version has been loaded properly by taking note of the BIOS identifier as the system is rebooting.
For AMI BIOS
Once the BIOS has been successfully loaded, remove the floppy disk and reboot the system holding the “END” key prior to power on until you enter CMOS setup. If you do not do this the first time booting up after upgrading the BIOS, the system will hang.
BIOS Update Tips
note:
1.Make sure never to turn off or reset your computer during the flash process. This will corrupt the BIOS data. We also recommend that you make a copy of your current BIOS on the bootable floppy so you can reflash it if you need to. (This option is not available when flashing an AMI BIOS).
2. If you have problems installing your new BIOS please check the following:
Have you done a clean boot?
In other words, did you follow the above procedure for making a bootable floppy? This ensures that when booting from “A” there are no device drivers on the diskette. Failing to do a clean boot is the most common cause for getting a “Memory Insufficient” error message when attempting to flash a BIOS.
If you have not used a bootable floppy, insure a clean boot either by
a) pressing F5 during bootup
b) by removing all device drivers on the CONFIG.SYS including the HIMEM.SYS. Do this by using the EDIT command.
Have you booted up under DOS?
Booting in Windows is another common cause for getting a “Memory Insufficient” error message when attempting to flash a BIOS. Make sure to boot up to DOS with a minimum set of drivers. Important: Booting in DOS does not mean selecting “Restart computer in MS-DOS Mode” from Windows98/95 shutdown menu or going to Prompt mode in WindowsNT, but rather following the above procedure (format a: /s and rebooting from a:\).
Have you entered the full file name of the flash utility and the BIOS plus its extension?
Do not forget that often you will need to add a drive letter (a:\) before flashing the BIOS. Example: when asked for file name of new BIOS file which is on your floppy disk, in case you’re working from c:\ your will need to type a:\615j900.bin, rather than 615j900.bin only.
![]()
It’s Windows Vienna

Windows 7 (formerly codenamed Blackcomb, then Vienna) is a future version of Microsoft Windows. It is expected to be the successor to Windows Vista. Microsoft has confirmed that the planned development time frame is at least three years, putting the release date around 2010. On July 20, 2007, Microsoft confirmed that Windows 7 is “the internal name for the next version of the Windows Client OS”.
Microsoft has refrained from discussing the details about Windows 7 publicly as they focus on the release and marketing of Windows Vista,though some early details of various core operating system features have emerged at developer conferences such as Windows Hardware Engineering Conference in 2006.

On February 9, 2007, Microsoft’s Ben Fathi claimed that the focus on the operating system was still being worked out, and could merely hint at some possibilities:
“We’re going to look at a fundamental piece of enabling technology. Maybe it’s hypervisors. I don’t know what it is” [...] “Maybe it’s a new user interface paradigm for consumers.
”
Bill Gates, in an interview with Newsweek, also suggested that the next version of Windows would “be more user-centric.” When asked to clarify what he meant, Gates said: “ That means that right now when you move from one PC to another, you’ve got to install apps on each one, do upgrades on each one. Moving information between them is very painful. We can use Live Services to know what you’re interested in. So even if you drop by a [public] kiosk or somebody else’s PC, we can bring down your home page, your files, your fonts, your favorites and those things. So that’s kind of the user-centric thing that Live Services can enable. [Also,] in Vista, things got a lot better with [digital] ink and speech, but by the next release there will be a much bigger bet. Students won’t need textbooks; they can just use these tablet devices. Parallel computing is pretty important for the next release. We’ll make it so that a lot of the high-level graphics will be just built into the operating system. So we’ve got a pretty good outline. ”

![]()


